/*
For Loop Iteration
Demonstrates the use of a for() loop.
Lights multiple LEDs in sequence, then in reverse.
The circuit:
* LEDs from pins 2 through 7 to ground
created 2006
by David A. Mellis
modified 30 Aug 2011
by Tom Igoe
This example code is in the public domain.
http://www.arduino.cc/en/Tutorial/ForLoop
*/
int timer = 200; // The higher the number, the slower the timing.
void setup() {
// use a for loop to initialize each pin as an output:
for (int thisPin = 2; thisPin < 11; thisPin++) {
pinMode(thisPin, OUTPUT);
}
}
void loop() {
// loop from the lowest pin to the highest:
for (int thisPin = 2; thisPin < 11; thisPin++) {
// turn the pin on:
digitalWrite(thisPin, HIGH);
delay(timer);
// turn the pin off:
digitalWrite(thisPin, LOW);
}
// loop from the highest pin to the lowest:
for (int thisPin = 10; thisPin >= 2; thisPin--) {
// turn the pin on:
digitalWrite(thisPin, HIGH);
delay(timer);
// turn the pin off:
digitalWrite(thisPin, LOW);
}
}
2013年11月9日 星期六
2013年10月14日 星期一
使用Arduino UNO 燒錄ATMEGA8 實驗一
使用Arduino UNO 燒錄ATMEGA8
軟體操作程序:
使用軟體 ARDUINO 1.05
硬體 Arduino UNO R3
Step 1 : 將 Arduino UNO 變成 ArduinoISP (上傳 ArduinoISP code 到 UNO板子上)
作法:

任務成功。
參考網頁
Nirzaree's Blog Make a standalone Atmega8 circuit
http://nirzaree.wordpress.com/2012/03/07/make-a-standalone-atmega8-circuit/
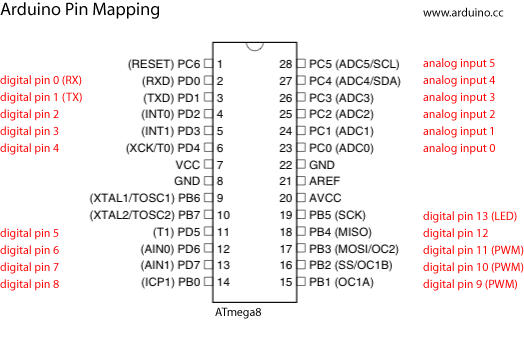
ATmega8-Arduino Pin Mapping (接腳圖)
http://arduino.cc/en/Hacking/PinMapping?from=Main.PinMapping
 |
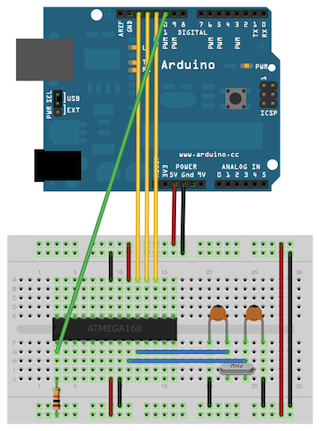
參考下圖 連接於麵包板上
軟體操作程序:
使用軟體 ARDUINO 1.05
硬體 Arduino UNO R3
Step 1 : 將 Arduino UNO 變成 ArduinoISP (上傳 ArduinoISP code 到 UNO板子上)
作法:
將 UNO 連接到 PC ,從選單 File -> Examples -> ArduinoISP and upload this sketch.
Step 2 : 燒錄 bootloader 到 Atmega8
作法:
連接 Atmega (Atmega8 ) to the UNO 板上 ,如上面電路圖所示.
連接 Atmega (Atmega8 ) to the UNO 板上 ,如上面電路圖所示.
從 選單 Tools -Board 選 Arduino NG or older w/ Atmega8
從 選單 Tools - programer 選 Arduino as ISP
最後 選單 Tools - Burn Bootloader
將 Bootloader燒到 Atmega8
Step 3: 驗證是否成功(將 Blink 範例燒入Atmega8)
作法:
Step 3: 驗證是否成功(將 Blink 範例燒入Atmega8)
作法:
將 Atmega328 從 UNO 板上取下,並且將麵包板上的 Atmega8 放到 UNO的IC座上
,請小心接腳不要弄錯 (兩顆IC 缺口要在相同的位置,取下IC前先確認或是查看 )。
並且在拔插IC時要拔下USB接頭讓電源關閉。
,請小心接腳不要弄錯 (兩顆IC 缺口要在相同的位置,取下IC前先確認或是查看 )。
並且在拔插IC時要拔下USB接頭讓電源關閉。
完成後 接上USB
從 選單 File – Examples – Basics – Blink 選擇 Blink範例
從 選單 File – Examples – Basics – Blink 選擇 Blink範例
從 選單 Tools -Board – NG or older w/Atmega8 板子設定
再次確認 COM埠值(會不一樣)
再次確認 COM埠值(會不一樣)
燒錄
稍帶片刻 UNO 板上的 第13腳 LED 會閃表示正常。
Step 4 : 將Atmega8 移回麵包板上,觀察是否正常。
移除上圖黃色與綠色的線,保留其餘連線如下圖
Step 4 : 將Atmega8 移回麵包板上,觀察是否正常。
移除上圖黃色與綠色的線,保留其餘連線如下圖

在IC的第19腳接上 220歐姆電阻串聯LED 到 5V端,查看是否LED會閃爍.如下圖。
在拔插IC時暫時中斷電路電源。
另外在 Nirzaree's Blog 中對於UNO PIN13 對應寫錯 應該是 ATMAGE 8的第 19 腳。
在拔插IC時暫時中斷電路電源。
另外在 Nirzaree's Blog 中對於UNO PIN13 對應寫錯 應該是 ATMAGE 8的第 19 腳。
任務成功。
參考網頁
Nirzaree's Blog Make a standalone Atmega8 circuit
http://nirzaree.wordpress.com/2012/03/07/make-a-standalone-atmega8-circuit/
GROBO
DIY Arduino - 將Bootloader寫進ATMega晶片
2013年10月13日 星期日
單用 Atmega8
入門簡單資料
http://www.protostack.com/blog/2010/06/introduction-to-io-registers/
內部fuse設定
http://www.engbedded.com/fusecalc/
接針腳零件在電路板的技巧
http://learn.adafruit.com/boarduino-kits/usb-boarduino-assembly
一些有趣的作品與商品
http://www.adafruit.com/
海峽西方的網站
http://www.geek-workshop.com/forum-49-1.html
Atmel AVR programmer schematics and designs,
http://avrprogrammers.com/devices/ATmega/atmega8
Arduino 燒錄 Atmega8 方法
http://robotrabbit.blogspot.tw/2012/08/arduino-diy-atmega8bootloader.html
http://gcyrobot.blogspot.tw/2011/06/diy-arduino-bootloaderatmega3.html
研究arduino支持Atmega8作为主控制芯片
http://www.51hei.com/mcu/2021.html
電阻色碼換算
http://www.dannyg.com/examples/res2/resistor.htm
Arduino Without FTDI chip using V-USB (Virtual USB)
http://forum.arduino.cc/index.php?topic=131177.0
2013年9月7日 星期六
2013年9月6日 星期五
102學年度機器人專題製作免死金牌
希望本組同學能盡量配合使這次的合作非常愉快。
機器人專題製作目標:
- 重新檢視在資訊科三年來所學習的專業知識。
- 應用重組與創新自己掌握的能力開發機能機器人。
- 有效率的學習Arduino著重在理解上。
- 完成一件可以在眾人面前發表的完整作品。
取得下列資格者獲頒阿西莫夫免死金牌(Award of Isaac Asimov )一面:(保證及格)
- 獲得全國技能競賽初賽前五名以上
- 獲得全國工科技能競賽前20名優勝以上
- 獲得全國高職專題競賽佳作以上
- 獲得東區科展佳作以上
- 獲得花蓮縣機器人類競賽佳作以上
- 獲得大學辦理之機器人類競賽佳作以上
- 完成的專題作品獲得科內二位以上老師按讚
免死金牌失效條件(例外狀況):
- 修課期間任一科目考試作弊
- 上課玩電動上不當網站屢勸不聽(被抓3次以上)
- 擾亂上課秩序屢勸不聽,如:老師講課時一直發出聲響(被糾正3次以上)
訂閱:
文章 (Atom)